Showing posts with label DIY. Show all posts
Tuesday, February 7, 2012
Runway Beauty D.I.Y.: Louis Vuitton Spring 2012
It's been a while since I've done a beauty D.I.Y. post, but I couldn't resist recreating the feminine beauty look on Louis Vuitton's spring runway. The models' makeup was dewy with a major emphasis on lashes, and hair was coiffed into messy bun/twist hybrids topped off with sparkling headbands. I have a feeling that the headband is making a comeback this year, as already evidenced by Charlize Theron and Michelle Williams' Golden Globe hairstyles.
HAIR:
The hair was MUCH simpler than I expected. I prepped my tresses with my new favorite product, Oribe's Dry Texturizing Spray, which built up some volume at the roots and imparted a dry, piecey texture, perfect for the updo. After several sprays and some teasing at the roots, I finger combed (you don't want to brush out the texture) and pulled my hair to one side, bobby pinning straight up the back to hold it in place. Then I started my twist, coiling up the base of my head toward the crown, covering up my row of bobby pins. Instead of leaving the ends to stick out at the top, I wrapped the twist around and back down to the base, and pulled the body of the twist to overlap, leaving some ends to stick out haphazardly. Then I secured with 3 spin pins--these work wonders! I added a couple more bobby pins as needed, but left things pretty messy. To finish off the look, I turned an old rhinestone necklace (from high school prom!) that I found in the back of a drawer into a sparkly headband. Thank goodness I save weird stuff.
MAKEUP:
The beautiful runway makeup was created by guru Pat McGrath. The skin was extremely dewy, so I began by using a luminizer all over my face. I think I overdid it, because my face is looking more oily than dewy in these photos. I used my usual liquid foundation next, and then went back in with the luminizer over cheekbones, under the brow bone, on the inside corners of my eyes, and at the cupid's bow of my lips. I used a sheer pinky peach blush on the apples of my cheeks and slightly contoured my cheekbones. For my eyes, I found that the Dior Rosy Tan palette provided the perfect range of colors. I used the shimmery beige all over the lids, the darkest brown to contour the socket line, then the lightest pink to highlight the center and inner corner of the lids. This was followed by a bit of dark brown liner, just on the upper lids. For the lower lids, I just softly lined with the dark brown eyeshadow. Next, I applied mascara and pulled out the false eyelashes. This was my first time applying false eyelashes, so I don't have any real words of wisdom, except to make sure the glue sets up a little before trying to adhere the lashes. For the Louis Vuitton show, Pat McGrath's team of makeup artists sewed together TEN pairs of false eyelashes for each model. My lashes look puny in comparison. I finished off the look with some quick brow grooming, and a little bit of peachy lip gloss.
Sunday, December 5, 2010
Runway Beauty D.I.Y.: Marc Jacobs
Marc Jacobs's spring 2011 beauty look played off of his glammed out 70s inspired clothes. The eyes were a dramatic hunter green, offset by soft rosy cheeks and matte wine-stained lips. This look would be perfect for any upcoming holiday parties, and I love the green smoky eye as an alternative to basic black.
To recreate the look, I began with my usual foundation and concealer routine. The skin at Marc Jacobs had a bit of a dewy glow to it, so I used liquid foundation and did not set it with powder. I made some attempt to conceal my eyebrows (the models at Marc Jacobs had theirs bleached), which wasn't so successful. For a soft pink flush, I used a light dusting of Nars Orgasm blush, which was actually used on the models for the show. Next, I focused on my eyes, using a green YSL palette (one of my favorite palettes--highly recommended). I applied a thin layer of the darkest green all over my lid, then applied a heavier layer at the outer corner, into my crease, and under my lower lash line. Next, I used a bright chartreuse color (sounds scary, but is actually quite flattering) on the inner half of my eye, bringing it around the inner corner. Finally, I lined the waterline of my eye with a black liner and applied mascara. For my lips, I used a sheer wine lipstick and blotted to get a matte finish.
I did not even attempt the giant frizzy hair, seeing as it required this preparation:
To recreate the look, I began with my usual foundation and concealer routine. The skin at Marc Jacobs had a bit of a dewy glow to it, so I used liquid foundation and did not set it with powder. I made some attempt to conceal my eyebrows (the models at Marc Jacobs had theirs bleached), which wasn't so successful. For a soft pink flush, I used a light dusting of Nars Orgasm blush, which was actually used on the models for the show. Next, I focused on my eyes, using a green YSL palette (one of my favorite palettes--highly recommended). I applied a thin layer of the darkest green all over my lid, then applied a heavier layer at the outer corner, into my crease, and under my lower lash line. Next, I used a bright chartreuse color (sounds scary, but is actually quite flattering) on the inner half of my eye, bringing it around the inner corner. Finally, I lined the waterline of my eye with a black liner and applied mascara. For my lips, I used a sheer wine lipstick and blotted to get a matte finish.
I did not even attempt the giant frizzy hair, seeing as it required this preparation:
Tuesday, November 2, 2010
Runway Beauty D.I.Y.: Louis Vuitton
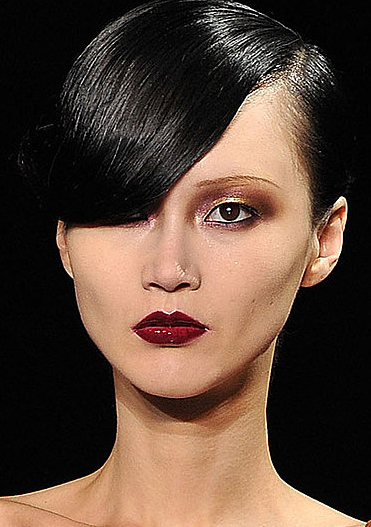
On Louis Vuitton's spring runway, the beauty look was all glitz and glam, augmenting the chinioserie chic and flapperific dresses. High drama, rendered in shimmer and shine...what's not to love? The deep aubergine eye and glossy wine lip is definitely an evening look, but it is still wearable. In real life, I would probably pair the heavy eye with a minimal lip, or vice versa.
This look requires a fully equipped makeup arsenal, BUT you can easily make substitutions (as I had to do) to achieve a similar effect. I began with a matte foundation finish, devoid of any blush, bronzer, or shimmer. I prepped my eyelids with a primer, then applied a thin line of black liquid eye liner on the inner rims of my eyes. Next, I applied a burgundy eye shadow to my crease line, and blended up to just under my brow. I applied the same color under my lower lashes. Then I took a shimmery gold shadow and applied it heavily to the inner half of my lid, and blended it out to meet the burgundy shadow. The burgundy shadow did not give my eye enough depth, so I layered on a dark plum to further contour my eye area, using it just in the crease, outer corner, and under my eye. Next, I brushed a shimmery white gold shadow into the inner corner to brighten the eye. Finally, I applied mascara. I had to get creative for my lips, because I do not own a shade comparable to the deep Vuitton color. I applied a sheer wine lipstick as heavily as possible, then blended dark plum eye shadow and clear gloss to finish it off.
Monday, October 25, 2010
Runway Beauty D.I.Y.: Giorgio Armani
The beauty look at Giorgio Armani's spring show was simple and seductive. All the inky blue and black frocks were enhanced by a smoky navy eye and dramatic turban. The blue eye was a fresh alternative to a black-lined look, and really made the models' eyes pop.
I recreated the look using a navy shadow by Urban Decay which contained a little bit of shimmer. First, I lightly lined the inner rims of my eyes with a black eye liner. This step could be eliminated, but it does give the eye some extra definition. Next, I started working the navy shadow into my lower lash line, and pulling the line out horizontally to give that eye-widening effect. The line on my upper lash line was fainter, and blended out over about half my lid. The Armani eyes also darkened the crease, but only on the inner half of the eye. This is the reverse of what I typically do when accenting the crease, but I think the idea was to offset the strong lower outer corner with a strong upper inner corner. To finish off the eyes, I swept on a light coat of mascara and used a little eye brow gel. For the rest of my face, I highlighted the top of my cheekbones and applied a little bronzer underneath them.

I recreated the look using a navy shadow by Urban Decay which contained a little bit of shimmer. First, I lightly lined the inner rims of my eyes with a black eye liner. This step could be eliminated, but it does give the eye some extra definition. Next, I started working the navy shadow into my lower lash line, and pulling the line out horizontally to give that eye-widening effect. The line on my upper lash line was fainter, and blended out over about half my lid. The Armani eyes also darkened the crease, but only on the inner half of the eye. This is the reverse of what I typically do when accenting the crease, but I think the idea was to offset the strong lower outer corner with a strong upper inner corner. To finish off the eyes, I swept on a light coat of mascara and used a little eye brow gel. For the rest of my face, I highlighted the top of my cheekbones and applied a little bronzer underneath them.
Tuesday, October 5, 2010
Runway Beauty D.I.Y.: Gucci
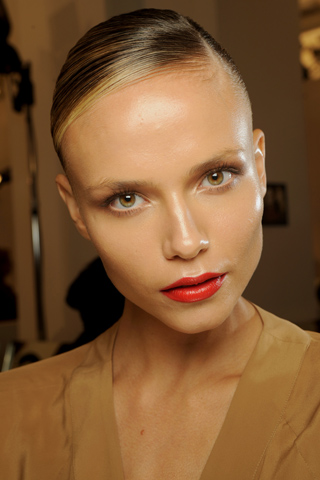
The hair and makeup at Gucci's spring show in Milan felt so current. The bold blood orange lip color took center stage, but equally impactful were the sleek hair and glowing skin. Each model's bone structure was emphasized with dewy, radiant skin. The look could be wearable on most women (minus the shellacked hair), and easily toned down for a day at the office, or amped up for a night on the town.
Step 1: FACE
The key to duplicating this look is creating the illusion of flawless, glowing skin. I began by mixing a little luminizing lotion (you need something with iridescent particles) in with my foundation and applying all over my face to create a dewy base. I followed with concealer, patting it in where I have imperfections or any discolorations. For this look, it is important to conceal anywhere you have slight redness or darker pigmentation in your skin--this can be time consuming, but it is worth it. I then used a highlighting pen (I recommend this one) to "lift" areas of my face, taking cues from my bone structure. It is best to use this under the eyes, on the brow bone, down the front of the nose, on the cupid's bow of your lips, and on your chin. Next, you want to work additional luminizer into your base to create a glow. Start by applying it high on your cheekbones, then arc upwards aroud the eye to the brow bone, creating a "C" shape. Finally, you want to add depth to your cheeks by sweeping bronzer under and around them, then blending up into your temples.
Step 2: EYES
For the eyes, you need a brown shadow with a little shimmer. I used this creme shadow, which has a nice pearly finish. Apply all over the lid and blend outwards. Then use a shimmery gold or white shadow to highlight the inner corner of the eye and go over the brow bone once again. Apply mascara to the top and bottom lashes. The eyebrows should be cleaned up a bit with a brow pencil (as needed) and brow gel.
Step 3: LIPS
For the lips, I layered an orange lipstick under a red gloss. For control and precision, use a brush to line the lips with the lipstick and then fill them in.
Step 1: FACE
The key to duplicating this look is creating the illusion of flawless, glowing skin. I began by mixing a little luminizing lotion (you need something with iridescent particles) in with my foundation and applying all over my face to create a dewy base. I followed with concealer, patting it in where I have imperfections or any discolorations. For this look, it is important to conceal anywhere you have slight redness or darker pigmentation in your skin--this can be time consuming, but it is worth it. I then used a highlighting pen (I recommend this one) to "lift" areas of my face, taking cues from my bone structure. It is best to use this under the eyes, on the brow bone, down the front of the nose, on the cupid's bow of your lips, and on your chin. Next, you want to work additional luminizer into your base to create a glow. Start by applying it high on your cheekbones, then arc upwards aroud the eye to the brow bone, creating a "C" shape. Finally, you want to add depth to your cheeks by sweeping bronzer under and around them, then blending up into your temples.
Step 2: EYES
For the eyes, you need a brown shadow with a little shimmer. I used this creme shadow, which has a nice pearly finish. Apply all over the lid and blend outwards. Then use a shimmery gold or white shadow to highlight the inner corner of the eye and go over the brow bone once again. Apply mascara to the top and bottom lashes. The eyebrows should be cleaned up a bit with a brow pencil (as needed) and brow gel.
Step 3: LIPS
For the lips, I layered an orange lipstick under a red gloss. For control and precision, use a brush to line the lips with the lipstick and then fill them in.
Thursday, September 30, 2010
Runway Beauty D.I.Y.: Prada
It is so easy for me to get in a hair/makeup rut, defaulting to the same safe brown eyeshadow and loosely curled hair. I was happy to find some fresh inspiration on the Milan runways! The beauty look at Prada was striking and extreme, begging for a real world interpretation. When toned down, the look could be perfect for New Year's Eve, or even just a night out on the town. It had three fairly straightforward elements: 30s style finger waves, a heavy silver eyelid, and a strong brow. Everything else was simple--a clean face, bare lips, and bare eyelashes.
I took a stab at recreating the look, aiming to make it less severe and more wearable. I began with the hair, applying a generous amount of gel and creating a hard side part. The finger wave technique is foreign to me, so I kind of fumbled my way through using a comb and clips to hold the waves in place until the gel was set. Next, I applied liquid foundation and concealer to create an even base, then dusted translucent powder over my whole face. For the eyes, I applied an eye primer, then swept a silver eye shadow all over my lids. Instead of bringing the silver all the way up to the brow a la Prada, I gradually blended outwards using a pearly white shadow. Next, I filled in my brows with pencil, adding thickness and length to the shape. Finally, I applied a hint of clear gloss on my lips and mascara on my upper lashes, just to feminize the look a bit.
Et voila! Prada done my way.
I took a stab at recreating the look, aiming to make it less severe and more wearable. I began with the hair, applying a generous amount of gel and creating a hard side part. The finger wave technique is foreign to me, so I kind of fumbled my way through using a comb and clips to hold the waves in place until the gel was set. Next, I applied liquid foundation and concealer to create an even base, then dusted translucent powder over my whole face. For the eyes, I applied an eye primer, then swept a silver eye shadow all over my lids. Instead of bringing the silver all the way up to the brow a la Prada, I gradually blended outwards using a pearly white shadow. Next, I filled in my brows with pencil, adding thickness and length to the shape. Finally, I applied a hint of clear gloss on my lips and mascara on my upper lashes, just to feminize the look a bit.
Et voila! Prada done my way.
Subscribe to:
Posts (Atom)